

🩺 Medical Review & Fact-Checking Statement Written by: Dr. Sana Lodhi, MBBS | Published: June 2026
Clinical Consensus: Every tip outlined in this guide matches current mainstream dermatological and first-aid protocols for minor foreign body removal.
Medical Disclaimer: The information on Healthy Post is for educational purposes only. Splinters that are deeply embedded, under the fingernail, or showing signs of infection (redness, pus, severe pain) require professional clinical extraction. If you are diabetic or have a compromised immune system, do not attempt to remove a splinter at home.
Getting a splinter is a small accident that can cause big discomfort. Whether it is from wood, glass, or a tiny metal shard, knowing how to remove a splinter safely is essential. When done correctly, you lower the risk of infection, reduce pain, and help the area heal quickly.
This guide walks you through what to do immediately, nine safe at-home methods, when to see a doctor, and how to care for the area afterward.
1. Start With Immediate First Aid 🧼
Before you touch the splinter, protect yourself from infection. Even a tiny fragment can introduce bacteria deep under your skin.
Wash the Area First
Gently wash the area with:
- Mild soap
- Clean, lukewarm water
Pat dry with a clean towel or tissue. This simple step helps remove dirt and reduces germs on the skin’s surface.
Examine the Splinter Closely
Use a:
- Magnifying glass
- Phone camera with zoom
- Bright light
Check:
- Depth
- Is part of the splinter sticking out?
- Is it just under the skin and barely visible?
- Direction
- Notice which way it entered.
- You will want to remove it in the same direction, not against it.
If the splinter is in a hard-to-reach place, such as your back or foot sole, ask a family member or friend to help. Trying to twist around may push it deeper.
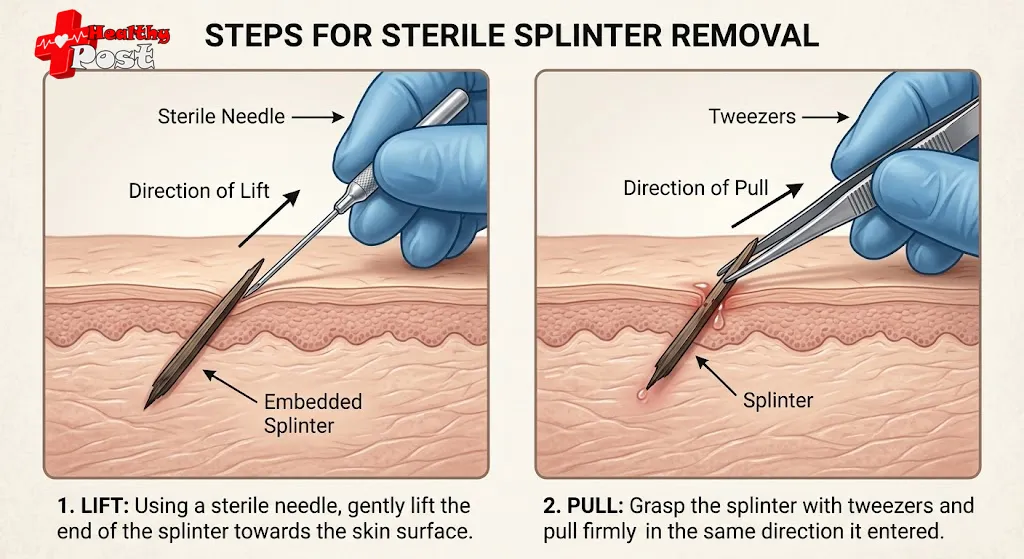
2. Use Clean Tweezers for Visible Splinters
Tweezers are often the safest and fastest option when the end of the splinter is sticking out.
When Tweezers Work Best
- Splinters sticking out from the skin
- Superficial splinters near the surface
- Straight, solid fragments like wood or glass
How to Use Tweezers Safely
- Clean the tweezers
- Wipe tips with rubbing alcohol.
- Let them air dry for a few seconds.
- Grip the exposed end
- Hold the skin gently with your other hand.
- Grasp the splinter as close to the skin as possible.
- Pull in the right direction
- Pull slowly and steadily.
- Follow the same direction as the splinter entered.
- Avoid squeezing
- Do not pinch or break the splinter.
- If it snaps, a piece may remain under the skin.
A quick example: someone grabs a rough wooden railing and ends up with a visible splinter in the fingertip. Sterilized tweezers, a firm grip, and a smooth pull often remove it in one step.
3. Try a Sterile Needle for Embedded Splinters
Sometimes the splinter is fully under the skin and no end is visible. In those cases, a needle can help lift it to the surface.
When a Needle May Be Needed
- Splinters fully embedded under thin skin
- Small fragments you can see but cannot grab
- Situations where tweezers alone cannot catch the tip
How to Use a Needle Carefully
- Sterilize the needle
- Clean a sewing needle or safety pin with rubbing alcohol.
- Clean the skin again
- Wash with soap and water if needed.
- Gently open the skin above the splinter
- Use the needle to lift the skin right above the fragment.
- Do not dig deep or widen the opening too much.
- Expose the splinter
- Once a tip appears, stop using the needle.
- Switch to tweezers
- Grasp the exposed end.
- Pull in the direction the splinter entered.
If you feel intense pain, see blood, or cannot see what you are doing clearly, stop and consider medical help instead of continuing.
4. Use Tape or Wax Strips for Near-Surface Splinters
When splinters are very shallow or too tiny to grab, gentle adhesive methods sometimes work.
Duct Tape for Shallow Splinters
Best for:
- Small, near-surface splinters
- Multiple fine particles (like fiberglass or tiny wood)
How it works:
- Clean and dry the skin first.
- Cut a small piece of duct tape.
- Press it firmly over the splinter area.
- Leave for about 30 minutes.
- Peel the tape in the opposite direction of entry.
This may pull out shallow fragments stuck close to the surface.
Wax Strips for Thin Plant Splinters
Best for:
- Very fine plant splinters (like cactus or thorns)
- Short, hair-like splinters
Steps:
- Follow directions on the wax strip package.
- Apply the strip firmly over the area.
- Let it set for the recommended time.
- Quickly pull in the opposite direction to the entry.
These methods should not be used for deep or painful splinters. If one pull does not help, stop rather than repeat many times and irritate the skin.
5. Draw Out Deeper Splinters With Home Remedies
Some splinters sit too deep for tools to grab easily. A few at-home approaches can help move them closer to the surface so removal becomes safer.
Baking Soda Paste
Best for:
- Deeper wooden or plant splinters
- Areas with thicker skin, like fingers or feet
How it works:
Baking soda can cause the skin to swell slightly, sometimes pushing the splinter toward the surface.
Steps:
- Mix 1/4 teaspoon baking soda with a few drops of water.
- Form a thick paste.
- Apply over the splinter site.
- Cover with a clean bandage.
- Leave in place for about 24 hours.
Later, remove the bandage and check. The splinter may be visible enough to remove with tweezers.
Epsom Salt Soak
Best for:
- Deeper splinters in hands or feet
- Sore, inflamed areas
Epsom salts may help reduce swelling and draw the splinter closer to the surface.
Steps:
- Fill a basin with warm (not hot) water.
- Add Epsom salts per package instructions.
- Soak the affected area for 15–20 minutes.
- Dry gently and inspect the skin.
If part of the splinter has risen, you can remove it with sterilized tweezers.
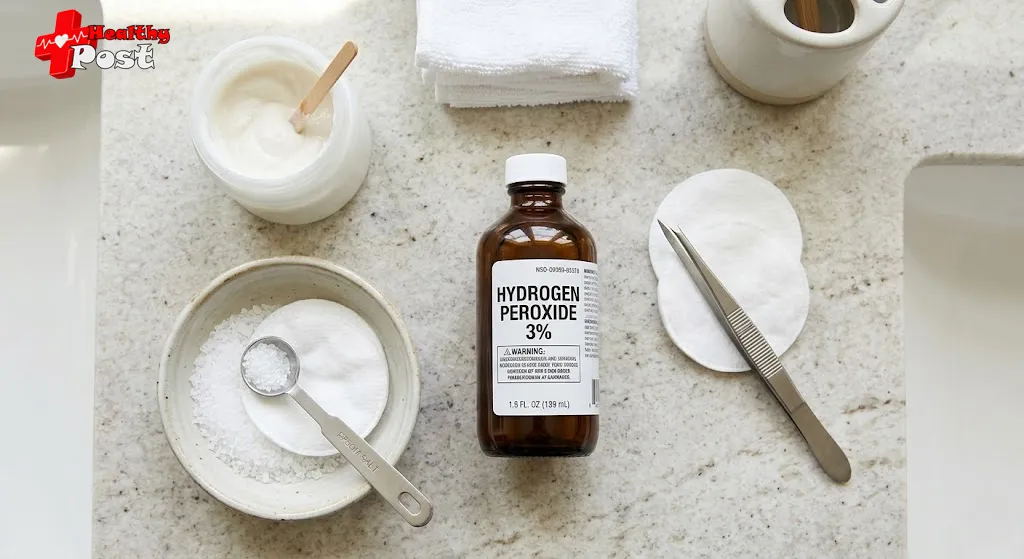
Hydrogen Peroxide for Embedded Splinters
Best for:
- Small, embedded splinters you can see but not grasp
Hydrogen peroxide can bubble and sometimes lift the splinter slightly.
Steps:
- Use a diluted 3% hydrogen peroxide solution.
- Pour a small amount over the area or apply with a cotton ball.
- Let it bubble for a few minutes.
- Rinse with clean water and pat dry.
Inspect the skin. If the splinter has moved closer to the surface, remove it with clean tweezers.
Note: Do not use hydrogen peroxide repeatedly over days on healthy skin. It can slow healing when overused.
6. Gentle Peel-Off Methods: Glue and Folk Remedies
Some people prefer very gentle, peel-off approaches. These can be helpful, but you must use them carefully.
White Glue (Elmer’s-Style)
Best for:
- Partially exposed splinters
- Sensitive skin where pulling with tweezers hurts
How it works:
The dried glue forms a film that may grip the splinter when peeled away.
Steps:
- Wash and dry the area.
- Apply a layer of white school glue over the splinter site.
- Let it dry completely.
- Gently peel off the glue opposite the entry direction.
If you are lucky, the splinter comes out with the glue layer.
Potato or Banana Peel (Folk Remedies) 🍌
These methods are traditional home remedies. Enzymes and moisture in the peel may soften the skin.
Possible effects:
- Slight skin softening
- Splinter moving closer to the surface
How people use them:
- Place a small piece of potato or banana peel, moist side against the skin.
- Secure with clean gauze or a bandage.
- Leave in place for several hours or overnight.
- Remove and check the area.
- If the splinter is more visible, remove with tweezers.
⚠️ Important caution:
These peels are not sterile. They can introduce bacteria. If the skin is already irritated or broken, there is a higher risk of infection. Use with caution, and avoid them if there are signs of redness, warmth, or pus.
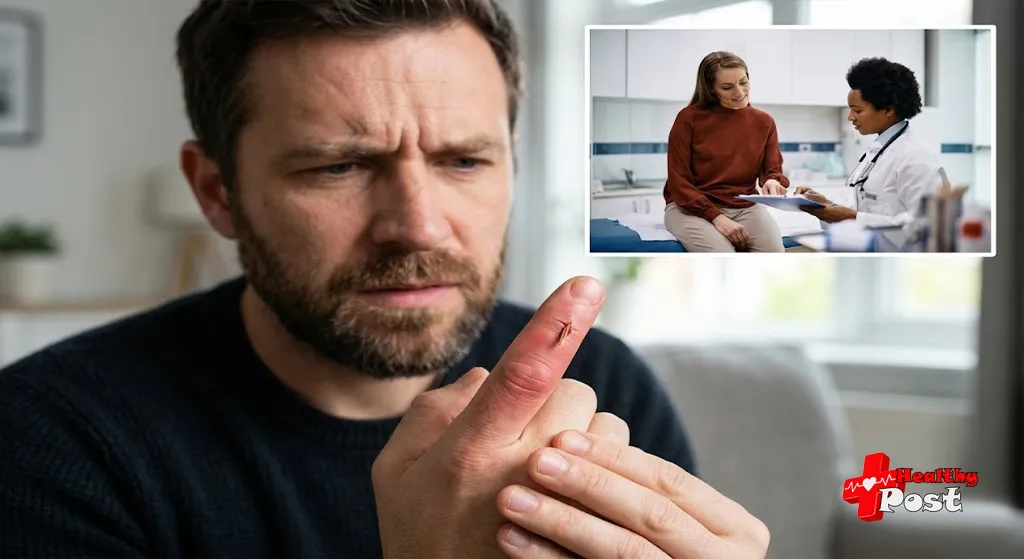
7. Know When NOT to Remove a Splinter at Home
Learning how to remove a splinter safely also means knowing when to stop and seek help. Some situations are too risky for at-home attempts.
Do Not Try at Home If:
- The splinter is deep, and you cannot see it clearly
- Digging can damage tissue and increase infection risk.
- A large object is stuck in the skin
- This is more than a simple splinter and needs urgent care.
- The splinter is near or in the eye
- Eye injuries can threaten vision. Go to emergency care immediately.
- The splinter is under a nail and very painful
- Professional removal is safer to prevent nail damage.
- There is heavy or steady bleeding
- This may need stitches or surgical attention.
- There are signs of infection
- Redness spreading from the site
- Swelling and increasing pain
- Warmth, pus, or foul odor
- Fever or feeling unwell
In these cases, a doctor or urgent care clinic should handle the removal. They can use sterile tools, numbing medicine, and, if needed, antibiotics.
8. Do Splinters Ever Come Out on Their Own?
Sometimes the body can push out small, superficial splinters over time.
How the Body Responds
Your immune system treats the splinter like a foreign invader. It sends white blood cells to the area, causing:
- Mild redness
- Swelling or a small bump
- Tenderness
With time, very tiny splinters may work their way to the surface and fall out.
When Waiting Is a Bad Idea
- Larger splinters tend to cause ongoing pain and swelling.
- Wood and plant splinters carry a higher risk of infection.
- Certain bacteria, including those causing tetanus, may enter through the wound.
Because of these risks, it is usually better to remove the splinter or have it removed promptly, rather than waiting for it to come out on its own.
If you are unsure about your tetanus vaccination status, talk to a healthcare professional. According to guidance from the Mayo Clinic, some injuries may require a booster shot.
9. Essential Aftercare Once the Splinter Is Out
Proper aftercare is a key part of knowing how to remove a splinter safely. Even after successful removal, the tiny wound needs attention.
Clean the Area Again
- Wash with mild soap and water.
- Rinse away any remaining debris or dried blood.
Pat dry with a clean towel or gauze.
Protect and Support Healing
- Apply a thin layer of antibiotic ointment (if you are not allergic).
- Cover with a small adhesive bandage or sterile gauze.
This keeps the area moist, protected, and less likely to rub against clothing or surfaces.
Change the Bandage Regularly
- Replace the bandage if it becomes wet, dirty, or loose.
- Usually, daily changes are enough for small wounds.
Continue to watch the area for:
- Increasing redness
- New or worsening pain
- Pus or fluid drainage
- Swelling or warmth
If these occur, consult a healthcare provider. They may need to:
- Drain any abscess
- Prescribe antibiotics
- Confirm that no splinter fragments remain
Quick Comparison of Splinter Removal Methods
Here is a summary table to help you choose the safest method for your situation:
| Method | Best For | Key Steps / How It Works |
|---|---|---|
| Tweezers | Superficial, visible splinters | Sterilize, grasp tip, pull in entry direction |
| Needle + Tweezers | Fully embedded but visible splinters | Sterilize needle, lift skin, expose tip, use tweezers |
| Duct Tape | Near-surface shallow fragments | Apply tape, wait ~30 minutes, peel opposite entry |
| Baking Soda Paste | Deeper wooden/plant splinters | Apply paste, cover 24 hours, splinter moves upward |
| Epsom Salt Soak | Deeper splinters in hands/feet | Warm soak 15–20 minutes, check if tip surfaced |
| Hydrogen Peroxide | Embedded but visible small splinters | Apply diluted 3% solution, let bubble, inspect |
| Wax Strips | Thin plant splinters | Apply strip, let set, pull opposite entry |
| White Glue | Partially exposed splinters | Let glue dry over area, peel off with splinter |
| Potato/Banana Peel | Folk remedy for deeper splinters | Apply peel overnight, may soften skin (infection risk) |
7 Key Takeaways on How to Remove a Splinter Safely
To bring everything together, here are seven core tips:
- Clean first, always
- Wash with soap and water before any attempt.
- Study the splinter’s depth and direction
- Use light and magnification to guide your method.
- Use sterilized tools
- Clean tweezers and needles with rubbing alcohol.
- Pull in the direction of entry
- This reduces breakage and tissue damage.
- Use home remedies to bring deep splinters up
- Baking soda, Epsom salts, and gentle methods can help.
- Watch closely for infection
- Redness, swelling, warmth, and pus are warning signs.
- Know when to seek medical help
- Deep, hidden, eye-area, or heavily bleeding splinters need experts.
When you follow these steps, learning how to remove a splinter becomes much safer and less stressful.
Frequently Asked Questions
1. How soon should I remove a splinter?
As soon as possible. The longer it remains, the higher the risk of infection and inflammation.
2. What if a tiny piece of splinter is left inside?
Sometimes very small pieces eventually break down or work out. But if you have pain, swelling, or redness, see a doctor.
3. Can I use a needle that is not sterilized?
No. Unsterilized tools increase infection risk. Always clean the needle with rubbing alcohol before use.
4. Is it safe to use home remedies on children?
Use extra caution. Choose gentle methods like tweezers for visible splinters. Avoid deep digging and see a pediatrician if unsure.
5. Do I always need antibiotics after a splinter?
Not always. If the splinter is removed quickly and the area stays clean and non-inflamed, antibiotics are usually not needed. A doctor decides if they are necessary.
6. How do I know if I need a tetanus shot?
If the splinter came from dirty metal or soil, or your last tetanus shot was more than 10 years ago (or 5 years for high-risk wounds), ask your healthcare provider about a booster.
Conclusion: Handle Splinters Promptly and Safely ✅
Splinters are common, but they should not be ignored. Understanding how to remove a splinter with clean tools, calm steps, and proper aftercare can prevent infection and lasting discomfort. Use tweezers for visible fragments, a sterile needle for embedded ones, and supportive home methods to bring deeper splinters closer to the surface.
Most mild splinters can be treated at home, but you should always seek medical care if a splinter is deep, located near sensitive areas like the eyes or under nails, or shows any sign of infection. Acting early protects your health and helps your skin heal smoothly.
How soon should I remove a splinter?
As soon as possible. The longer it remains, the higher the risk of infection and inflammation.
What if a tiny piece of splinter is left inside?
Sometimes very small pieces eventually break down or work out. But if you have pain, swelling, or redness, see a doctor.


Job Title: Medical Doctor & General Health Specialist
Institutional Affiliation: Liaquat University of Medical & Health Sciences (LUMHS)
Specialties: General Clinical Medicine | Preventive Healthcare | Patient Wellness Education
Dr. Sana Lodhi, MBBS, is a qualified medical doctor and general health specialist with years of clinical experience. At Healthy Post, she specializes in simplifying complex healthcare topics into clear, practical guidance, authoring comprehensive health awareness articles that empower individuals to make informed decisions and live healthier, more balanced lives.
Verify Medical Credentials:
1 Comment
Pingback: Giant Hogweed Burns: 7 Shocking Facts, Dangers, and Essential Treatment Steps